Hello,
I will describe here step by step configuration of WordPress in configuration of two servers. These can be physical servers, or installed on virtual machines, either using VirtualBox or HyperV.
Usually we encounter these configurations above, of course there are also other solutions, such as in the case of the hosting service provider, which has a database elsewhere, and in another location keeps a directory on the files of the website, but I will deal with the classic case, when we distinguish between two different servers.
Why such a solution? For a simple reason – security. There is no external access to the database server, i.e. from the Internet. It is in favour of the so-called NAT.
I will describe the solution that I implemented at home on two laptops, which serve as servers at home for my own learning purposes.
Have you reached this place? Great! Let’s get started.
- Database server – CentOS 7.6
- Web serwer – Debian 9.8.0 or CentOS, Red Hat, Fedora
- Database server: Server with CentOS, on which the database is installed.
- Web server: Server with Debian, on which the WordPress is installed.
wordpress: database name.user: User – WordPress database clientdatabase_user_password: SQL database user’s password for WordPress.192.168.0.11: Private IP address of the database server.192.168.0.10: Private IP address of the web server.example_user: Local user with sudo privileges, who is not a root.190.100.100.90/example.com: Public IP address of the server or full qualified domain name (FQDN).
Install the MariaDB 10.3 database server on CentOS with the command:
| |
If you don’t have nano, install it with a command. Use is easier than vi. Sorry old sysops, I know it can make you angry. I can use vi and vim, but nano is much easier for beginners.
| |
Insert this into MariaDB repo file:
| |
Press ctrl+o to save. Press ctrl+x to exit nano.
Install the MariaDB server and the client:
| |
Start the MariaDB server:
| |
Turn on the MariaDB server permanently:
| |
Check the status of the MariaDB service :
| |
Run MariaDB support with a command, because you do not have a root database user password.
| |
After logging in, set your root password to MariaDB with a command:
| |
Enter
Log in to MariaDB with earlier pre-determined password:
| |
Type your password for a root user to access a MariaDB.
Check the status of the MariaDB
| |
Enter
Exit MariaDB
| |
Enter
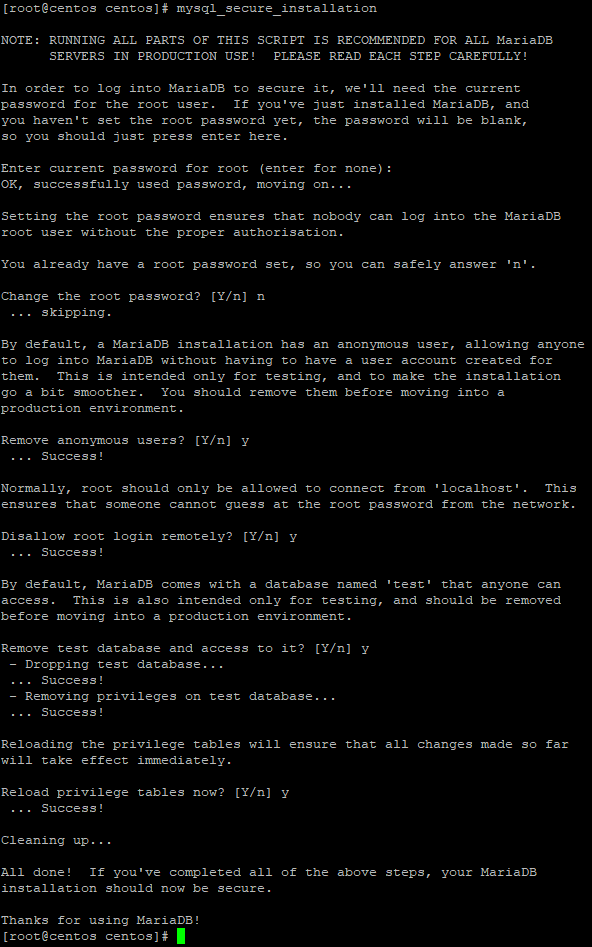
Perform the following command:
| |
You will see the following window in which you answer the question about changing the root password with the letter n, because it was set in advance. The remaining items are confirmed with the capital letter Y.

The firewall is installed by default in CentOS. Check if it is enabled.
| |
Listing ports and firewall services:
| |
Add mysql service and port:
| |
Restart the firewall.
| |
Delete a service or port. This is not needed at this point, but it may come in handy someday. Port 3306 is used by MariaDB and MySQL. If you want to add this port instead of a service, which can sometimes be a solution, replace „add” with „remove” as shown below.
| |
Log into Maria DB.
| |
Execute the following command to add a database named wordpress.
| |
Follow the command to create a user who will use this database. It should not be a root user for security reasons.
| |
Assign privileges to a user.
| |
Create a user and assign remote access rights to the wordpress database to the user. The IP address is the local IP address of the web server where WordPress is located. The password is the same as the password of the user created above.
| |
Then perform below commands:
| |
Check if you are able to log in with the created user:
| |
Type user’s password.
Then check the status:
| |
On a Debian web server, run the following command:
| |
Check if you can log in with the following command:
| |
Check MariaDB status:
| |
Close the connection by leaving MariaDB.
| |
WordPress installation
Create a directory named src in your site directory to store new copies of WordPress source files. This guide uses the home directory /var/wwww/html/example.com/ as an example. Go to this new directory:
| |
Set the user of the web server, www-data, as the owner of the home directory of your website. www-data is a group.
| |
Install the latest version of WordPress and extract it:
| |
Rename the latest.tar.gz file to wordpress, then set the backup date for the original source files. This will be useful if you install new versions in the future and need to return to the previous version:
| |
Create the public_html directory, which will be the WordPress root directory. Move the WordPress files to the public_html folder:
| |
Give the public_html folder permissions for the www-data group:
| |
Go to the directory where WordPress was extracted, copy the sample configuration and set it to use the remote database:
| |
Change the login variables to match the database and the user. Replace 192.168.0.11 with a private IP address for the database server. Edit the file: /var/wwww/html/example.com/public_html/wp-config.php
| |
Add security keys to protect your wp-admin. Use WordPress Security Key Generator to create random, complex hashes that WordPress will use to encrypt your login data. Copy the result and replace the corresponding section in the wp-config.php file:
| |
Security of traffic to and from the WordPress database using SSL
By default, CentOS has created a directory with certificates and no directory needs to be created. You can enter it:
| |
Generate a certification authority key and create a certificate and a private key. Response to appropriate prompts. The key in this example expires in 100 years. Change the days of 36500 days in this and the following steps to set certificates to expire if necessary:
| |
Common Name set as: MariaDB
Create a server certificate and save the RSA key. The common name should be the FQDN name or IP address of your web server. In this case, 190.100.100.90
| |
Sign the certificate:
| |
Move the keys and certificate to a permanent location:
| |
Generate a client key. Answer the appropriate prompts and set the common name to FQDN or the IP address of your web server: 190.100.100.90
| |
Save it as an RSA key.
| |
Sign the customer’s certificate.
| |
Verify certificates .
| |
It should display OK next to both.
Edit server.cnf file to CentOS
| |
Add in the [mysqld] section:
| |
Find the commented #bind-address line, delete # , which will cause uncommentation and set as below. Of course, change the IP address to the local IP address of the CentOS server where the MariaDB database is installed.
| |
Press ctrl+o, then ctrl+x
Move the server-key file to the private folder
| |
Log in to MariaDB and require SSL protocol for all logins to the database. Replace 192.168.0.10 with a private IP address.
| |
| |
Restart the MariaDB server:
| |
Copy certificates and the key to the web server. Replace example_user user with WWW server user and 192.168.0.10 with private IP address of WWW server:
| |
Create a directory on your web server and transfer the certificates and key to /etc/mysql/ssl:
| |
If the /etc/mysql/ssl directory already exists, execute the command itself with &&& tags.
Configure the MariaDB client of your web server to use SSL. Find the [mysql] section in the 50-mysql-clients.cnf file and add locations for certificates and keys:
| |
Paste the following content in the [mysql] section :
| |
In case you have two servers based on Red Hat, CentOS, or Fedora, edit the file mysql-clients.cnf
| |
paste the following content into the [mysql] section of this page
| |
Log in from the Debian web server to the CentOS MariaDB database server using the following command:
| |
If it connects, the MariaDB prompt is displayed. Type the command:
| |
Add a directive before the remote database in wp-config, which forces WordPress to use SSL to connect to the database:
| |
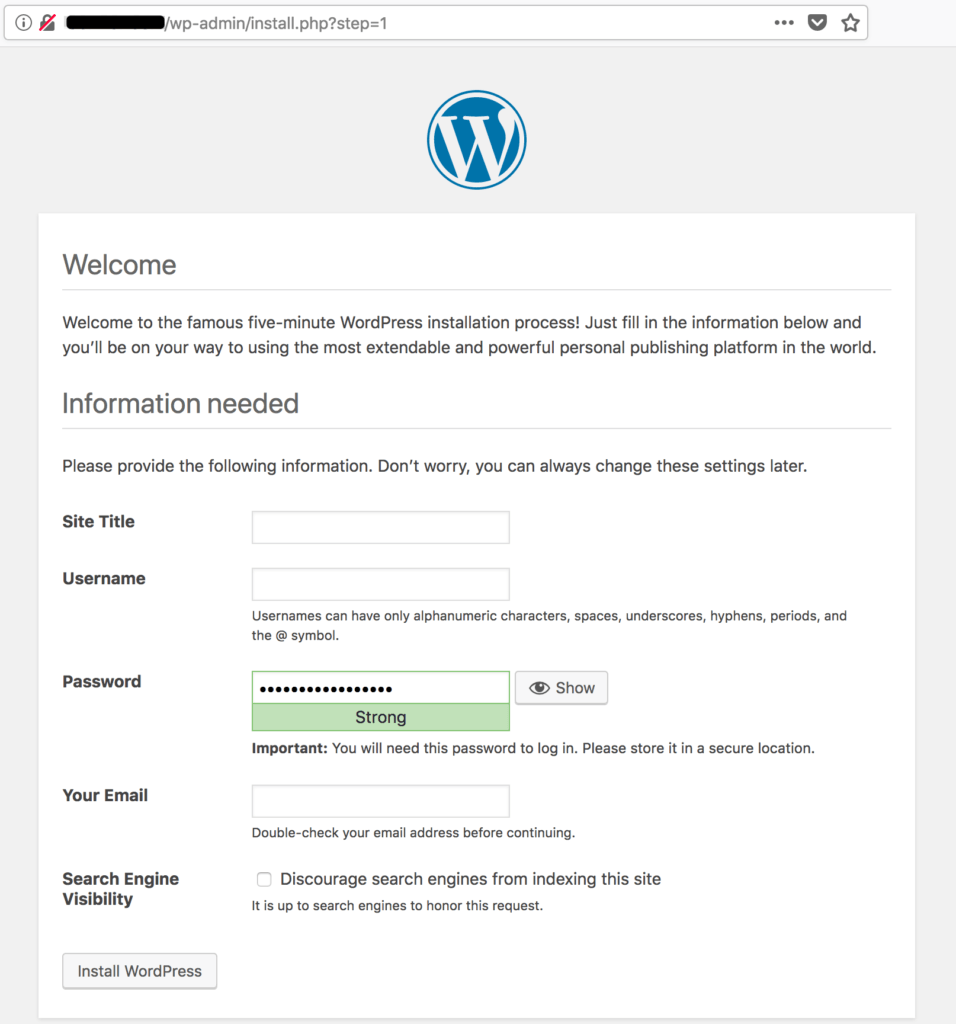
Access the WordPress installation interface via wp-admin. Use your browser to go to example.com/wp-admin. If the database connection is successful, you will see the installation screen:

Comments